In today’s instalment of our Digital Toolkit, we’re back with our paid media pro, Anish, to talk all things Meta ads. Whether you’re looking to get more results from your existing ads, or aren’t sure how to get started with them, Anish’s insider advice is for you.
When you decide to advertise on Facebook and Instagram, you have the potential to reach at least 2 billion people globally. So it’s no wonder that Meta Ads is often the number one choice for many businesses looking to get started with paid advertising.
Want to understand how to drive conversions through the world’s number-one social media platform? Read on as we unpack the 19 steps to launching successful paid social ads.
Set up your conversion tracking
Conversion tracking is essential to your Facebook ad campaign, as it shows how well your ads are actually working; if you only look at how many people click on them, you’re only getting half the picture So, let's get into how to set up conversion tracking on Facebook.
Decide on the best conversion goals for you
Step one is deciding on the best conversion goals for you. But firstly, what is a conversion? In its simplest form, if someone ‘converts’, they are taking the action that you wanted them to take. Depending on your business, examples could include:
- Subscribing to a newsletter
- Filling in a form
- Adding something to cart
- Creating an account
- Making a purchase
Set up your conversion goals in Meta
Once you’ve decided on what you want to track, it’s time to add these conversion goals to your Meta account.
Get your conversion tracking code
Next, you'll need to get the conversion tracking code provided by Meta Ads for each goal. This code is a snippet of JavaScript that you’ll add to the web page that users land on after completing the conversion action.
Add the code to your website
Once you have the conversion tracking code, you'll need to add it to the relevant pages on your website (may need help from a developer for this).
Test the tracking code
Before you start running ads, you should test the tracking code to make sure it's working correctly. You can do this by completing the conversion action yourself and making sure that the tracking code fires.
Set up conversion tracking in Meta ads
Finally, you'll need to set up conversion tracking in your Meta Ads account. This involves adding the conversion goals you created earlier and linking them to the conversion tracking code on your website.
Define your custom audiences
No matter the conversion goal of your ad campaigns, the audience you target will play a pivotal role in how the campaign performs. If your ad isn’t relevant to the person seeing it, they won’t engage with it — no matter how compelling it is. It’s therefore important to carefully define your custom audiences, which are audiences generated from the data you provide Meta.
Uploading custom audiences is actually very simple. Just navigate to the “Audiences” section of your Meta Ads Account, where you can upload a list of your existing customers. You will need to include at least one unique identifier, which can be email, phone number, name, mobile advertiser ID, Facebook app user ID, or Facebook page user ID. You can also add additional information like country, postcode, city etc to increase the chances of Meta finding your customers. Uploading a list of your customers not only means you can show your existing customers ads, but it also helps Meta build a database of good ‘potential’ customers with similar characteristics and habits to your existing ones.
Adding your existing customers manually with a list creates a ‘static’ list of customers — i.e. it won’t automatically update as you get more customers. This is fine to start with, but if you want to eventually make this ‘dynamic’ (i.e. update automatically with new customers), you can either set up the Meta pixel on your website or use third-party CRM integrations such as Hubspot.
Setting up your campaigns
Now you’re ready with your custom audiences and conversion tracking, it’s time to build a campaign.
First, decide on a campaign objective
The first and most important step is deciding the campaign objective which should be dictated by your audience. If your goal is to attract new customers, you would probably select ‘Leads’ as your objective, given the large potential audience.
On the other hand, if you’re looking to retarget your current customers, choose ‘Traffic’ as the objective to make sure the ads reach the entire audience.
Additionally, you may want to choose a sales campaign when you have a large pool of people but there is a significant difference in quality within the pool. For example, I would use it to target our customers who have signed up but have not yet made a purchase, so Meta would target the people who are more likely to convert. Once you are happy with the campaign settings you can start setting up the Ad Set.
Set a budget
The higher your budget, the more likely you are to get more conversions. You can always start with a relatively small budget, perhaps £20/day and scale up as the campaign progresses.
If you are happy with the success of the campaign, which is subjective but could be based on CPC or Cost/Signup, you can increase the budget as you see fit. Additionally, your campaigns will say that the learnings are limited, which means that Meta is not receiving enough data to optimise the campaign. If you see this then it is usually a good idea to increase the budget.
💡 Top tip: If you want to change the Ad Set budget later, don’t change it by more than 20% at once. This is because if you do so, you may risk resetting the ad set, meaning all the valuable learning that the FB algorithm has been doing may be lost.
Pick your audience
This is where you decide who sees your ads. For campaigns targeted at existing customers, you can simply just find your custom audience in the search bar. Additionally, the audience is chosen at the Ad Set Level as shown in the picture below, so you can have multiple different audiences within a single campaign. This can be useful, especially if you want to tailor your ads to different locations.
If you are looking to acquire new customers, then you have a couple of options. One option is that you can set up ‘Lookalike Audiences’, which are created by analysing the characteristics of your existing audience and finding similar users who are likely to be interested in your product or service.
Alternatively, ‘Detailed Targeting’ allows you to select specific demographics, interests, behaviours, and other criteria to reach a highly targeted audience.
Conversions, optimisations and delivery
If you have selected Sales or Leads as your campaign objective then you now have to choose which conversion event you want to be the primary indicator of success.
This is where you select one of the conversion events you configured earlier in the setup. Next, you have the choice of what you want your campaign to optimise towards. If the audience you are targeting is small then you should select a metric further up the funnel e.g. reach, however, if the audience is broad then you should select a conversion event such as signups or purchases.
Meta Ads recommends that each Ad Set has at least 15-25 conversions per week to optimise properly. If you do not reach this threshold there are a few things you can do:
- Increase your budget
- Expand your audience
- Change the conversion event - it may be the case that you need to set the conversion event as something further up the funnel so that more conversions are registered
Creating effective Facebook ads
Finally, you can create your ads. It's important to select eye-catching, high-quality visuals that will resonate with your target audience to make sure you stand out in users' crowded newsfeeds and achieve your campaign objectives.
Set clear objectives
Before you start creating your ad, define clear campaign objectives. Are you aiming for brand awareness, website traffic, lead generation, or sales? Perhaps your goal is multilayered, to drive both awareness and traffic to a specific landing page or social media account.
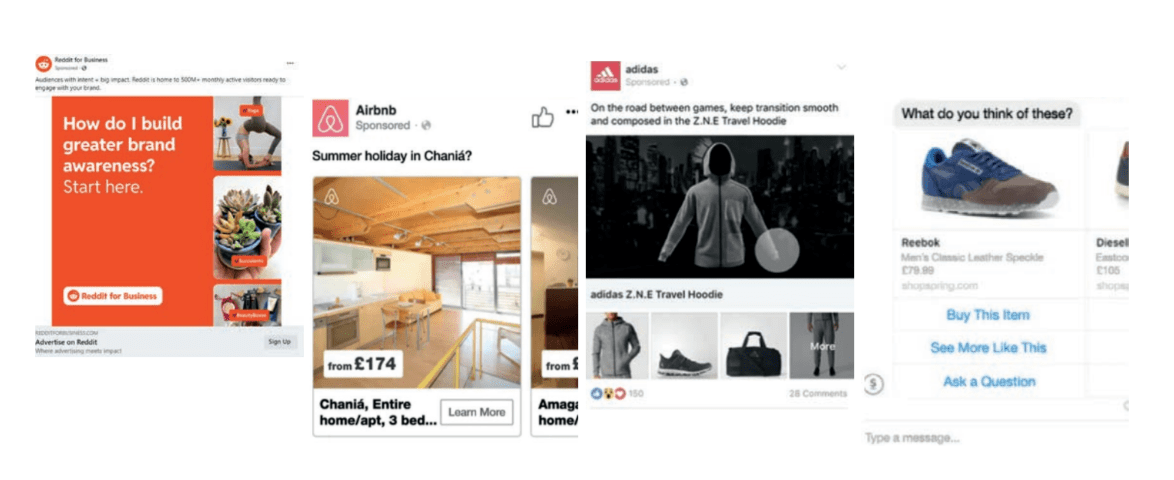
Either way, your objectives will help shape your ad's content and format as you progress your campaign. Facebook offers a variety of ad formats to choose from:
- Image ads
- Video ads
- Carousel ads
- Slideshow ads
- Story ads
- Messenger ads
- Collection ads
- Playable/interactive ads (for games)
The format you select should align with your campaign goals and the type of content you have. For example, a Collections ad is perfect if you have a whole range of products you’d like to promote, along with plenty of high-quality images to showcase them. This could work particularly well to group themed or seasonal products together and is a great way to drive conversions.
Carousel ads are also useful for this, as well as for sharing step-by-step processes, or staggered messaging to build anticipation or intrigue around your brand, a product launch, promotion, or more.
Ad creatives
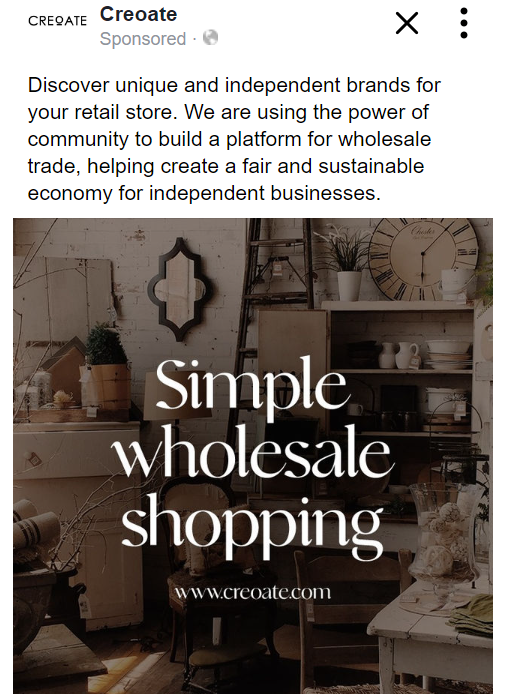
It should go without saying that high-quality visuals are key here, since first impressions are everything. Also ensure you adhere to Facebook’s image guidelines, with feed ads recommending a resolution of at least 1080 by 1080 pixels, with a maximum of 30 megabytes. Also be sure to follow platform-specific guidelines such as image size and text-to-image ratio. For example, the technical minimum requirement for size is 600 by 600 pixels with no maximum, with offer ads and ads with stock photos requiring the 1.91:1 ratio.
As a rule of thumb, it's usually a good idea to have three different sizes for your creatives: 1:1, 1.91:1 and 9:16 aspect ratios. The reason for this is that when uploading your creative, Meta makes it very easy to choose which version of your creative will be shown in different places. So for some placements, e.g. newsfeed supports square images, while others, e.g. Instagram Reels support Portrait image formats.
You also have the option to create a catalogue, which is a customised product feed to use in your ads. This feed can be used to create dynamic ads that showcase specific products, making it easier for customers to discover and purchase products directly from the ad without leaving Facebook or Instagram. From experience, I would recommend starting with at least one catalogue ad and one image/video ad within your campaign. Since every business is different, one may work better than the other, so you compare the results from the two ad types
Review Facebook's ad creative guidelines to ensure your ads comply with their policies. It’s generally recommended to avoid excessive text on images to avoid being penalised and adhere to any industry-specific regulations. Use Facebook's ad preview tool to see how your ads will look on various devices and placements. Seeing your ads in situ can help you spot and fine-tune any visual elements that may need improving.
Write engaging ad copy
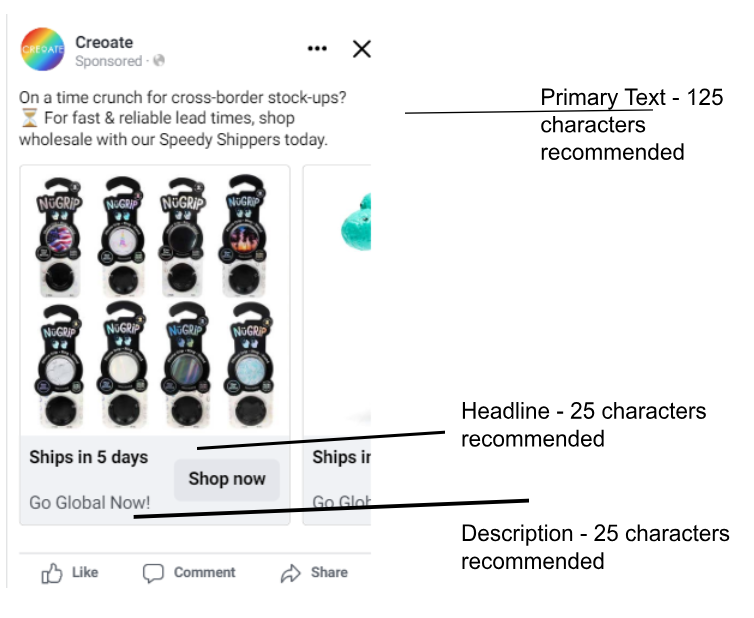
The next thing to decide on is the ad copy. Here it's important to focus on a clear and concise message that highlights the benefits of your product or service, uses attention-grabbing language and a strong call-to-action, and follows platform-specific guidelines such as character limits and prohibited language.
When crafting ad copy, use the character count and word limits to your advantage to be as snappy and succinct as possible. See this as a challenge rather than a limitation, and use it to fuel your creativity.
Break your messaging down into a hierarchy, prioritise the most important information, and try different variations you can switch up and test alongside each other to inform future ad campaigns. Always end with a clear call-to-action, or CTA to guide users on what and where you want them to act next. These might include:
- Shop now
- Learn more
- Sign up today
- Explore now
- Discover more
- Subscribe now
- Get started
- Add to cart
- Join
- Refer now
- View now
- Preorder
- Reserve now
As for headline copy, ensure you use this to complement and reinforce the main description copy, while also acting as a hook to spark curiosity and draw attention to the rest of the ad. Your headline should work in tandem with your visuals to draw focus, while your description copy provides additional context and details.
Deciding where the ad should send people
So, you need to decide on where people will be taken to when they click on your ad (this is not an issue if you are using a catalogue).
A good landing page for a meta ad should be visually appealing, with a quick loading speed, a clear headline and call-to-action, be mobile-optimised, and provide relevant and valuable content that aligns with the ad and satisfies the user's search intent. Often, a well-made homepage or product category page will work fine here, but if your product/service needs more explaining, or is a bit more complex, you may want to create different pages in the future so people can read what’s most important and interesting to them.
With Meta Ads you also have the choice of using instant experiences, which are full-screen mobile landing pages that provide an immersive and interactive experience for users who click on Facebook or Instagram ads, allowing businesses to showcase their products and services in a visually engaging and personalised way. You can create these in the Destination portion of the ad editing section.
Launching your ads
After deciding on the above, you’re all set to launch your ads! Just click publish at the bottom of the page and you’re all done!
Final thoughts
Although getting started on Meta ads can be a daunting prospect I hope that this guide will help you feel confident in launching your first ad through the platform, or maybe giving you some ideas for how to improve existing ones.
Remember that it's not necessary to rely solely on one ad platform, and I suggest incorporating other platforms like Google Ads and Pinterest alongside Meta Ads to fully optimise the growth of your business.
My final advice is that you should be restless on Meta Ads. You are never going to find the perfect audience, creative, copy etc on your first go. You need to keep experimenting to find out what works best for your business.
Want to add more tips and advice to your digital toolkit? Check out our series of blogs below to help expand your business across various digital platforms for maximum reach:
CREOATE Digital Toolkit: A Guide to Google Ads
CREOATE Digital Toolkit: How to Use Pinterest for Your Business
Not registered with CREOATE yet? Sign up now and start selling wholesale with us today.


